How To Install Realtek Audio Console: The soundscape of our digital world has evolved, and Windows offers an immersive audio experience that deserves to be fully explored. One essential tool for harnessing the power of your audio hardware is the Realtek Audio Console.
In this tutorial, we will walk you through the step-by-step process of installing the Realtek Audio Console on your Windows system, ensuring you have complete control over your sound settings. Let’s dive in!
What is RealTek Audio Console?
Realtek Audio Console is a software application developed by Realtek Semiconductor Corp., a leading manufacturer of audio and network components. It is designed to provide users with advanced control and customization over their audio settings on Windows operating systems.
Realtek Audio Console serves as a centralized hub for managing and adjusting various audio parameters, allowing users to fine-tune their audio experience according to their preferences. It offers a user-friendly interface that enables easy navigation and accessibility to a wide range of audio settings and features.
Key features and functions of Realtek Audio Console include:
- Equalizer Settings: Users can adjust the equalizer to modify the frequency response of their audio output. This allows for customization of bass, treble, and other audio frequencies to enhance the overall sound quality.
- Audio Effects and Enhancements: The application provides a selection of audio effects and enhancements to improve the listening experience. These may include virtual surround sound, voice enhancement, room correction, and more.
- Device Management: Realtek Audio Console supports the management of multiple audio devices, such as speakers, headphones, and microphones. Users can easily switch between devices and configure their audio settings accordingly.
- Audio Jack Configuration: The application allows users to configure the audio jacks on their system, enabling them to assign specific functions to each jack and customize audio routing.
- Real-Time Audio Monitoring: Realtek Audio Console provides real-time audio monitoring, allowing users to visualize audio levels and make adjustments on the fly. This is particularly useful for content creators, musicians, and individuals who require precise control over their audio recordings.
- Audio Presets: The software often includes pre-defined audio presets tailored for specific scenarios, such as gaming, movies, music, and communication. These presets optimize the audio settings to deliver an enhanced experience for each use case.
Why is Realtek Audio Console Significant?
Realtek has earned a reputation for delivering reliable and feature-rich audio solutions. Their drivers and software are trusted by hardware manufacturers worldwide, making Realtek audio technology a common choice for many PC users. Realtek’s commitment to innovation, compatibility, and sound quality has made it a prominent player in the audio industry.
Learn more in detail about Realtek Audio Console.
Benefits of Realtek Audio Console:
- Advanced Audio Customization: The Realtek Audio Console provides an intuitive interface that allows you to fine-tune your audio settings to suit your preferences. You can adjust equalizer settings, enhance bass or treble, and apply audio effects to enhance your listening experience.
- Audio Effects and Enhancements: Realtek Audio Console offers a range of audio effects and enhancements, such as virtual surround sound, voice enhancement, and noise reduction. These features can provide a more immersive and immersive sound experience, whether you’re gaming, watching movies, or listening to music.
- Smart and Automatic Detection: Realtek Audio Console is designed to intelligently detect and configure audio devices connected to your system. It automatically recognizes your speakers, headphones, and microphones, allowing for seamless switching and optimization of audio settings.
- Multiple Device Support: With Realtek Audio Console, you can easily manage and control audio settings for multiple input and output devices simultaneously. Whether you have external speakers, headphones, or a microphone connected to your system, Realtek Audio Console provides a centralized platform for managing your audio devices efficiently.
- Real-Time Audio Monitoring: Realtek Audio Console offers real-time audio monitoring, allowing you to visualize the audio levels and make necessary adjustments on the fly. This feature is particularly useful for content creators, podcasters, and musicians who require precise control over their audio recordings.
What’s the problem with Realtek Audio Console?
The main problem users face with the Realtek Audio Console is when they build or buy a new PC or Computer and install a fresh Windows or any other operating system. The RealTek driver is not available by default in the system. It’s a private application so it is hidden by default. It needs to be installed properly to be working for High Definition Audio experience.
If you are also facing something similar to not being abling to install the Realtek Audio Console app from the Microsoft Store then you are at the right place. All you have to do is to follow the below steps to get the Realtek Audio Console installed on your system.
Step 1: Prepare for Installation
To get started, we need to make sure we have the necessary driver for our motherboard. Realtek Audio Console relies on the proper drivers to function optimally. Here\’s what you need to do:
- 1.1 Visit your motherboard manufacturer’s website: Open your preferred web browser and navigate to the official website of your motherboard manufacturer. From there, Look for the ”Support” or ”Downloads” section of that Motherboard page.
- 1.2 Locate the correct driver: On the manufacturer’s website, search for the driver specific to your motherboard model and the version of Windows 11 you’re using. Download the latest version of the Realtek Audio driver package. Make sure to select the correct architecture (32-bit or 64-bit) that matches your operating system.
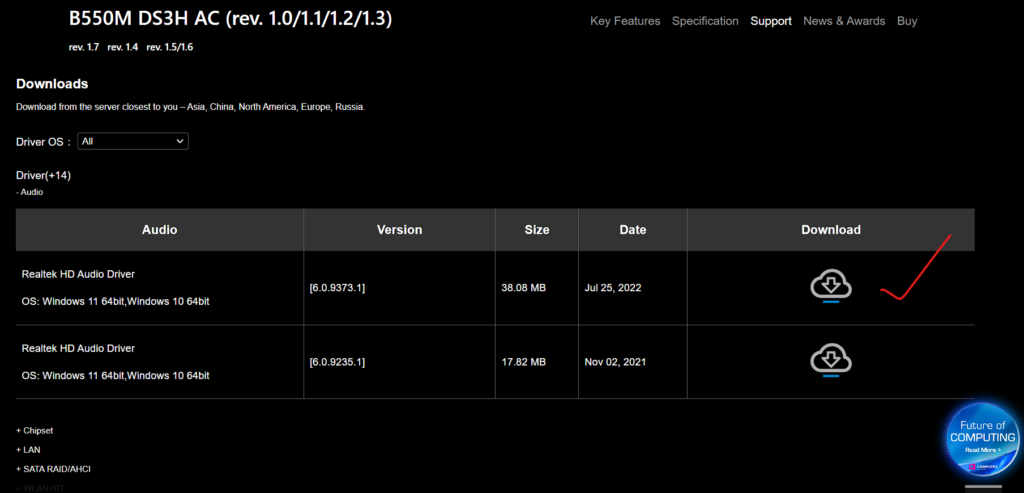
In our case, I searched for the Gigabyte B550M DS3H AC Motherboard and went to Gigabyte\’s official website with the model name of the motherboard. Here is the Motherboard page for the above-mentioned motherboard model from Gigabyte: https://www.gigabyte.com/Motherboard/B550M-DS3H-AC-rev-10-11-12-13/support#support-dl-driver
Unfortunately, for the time being, the 6.0.9373.1 version has been removed from the official website. You can download it from this Google Drive link: https://drive.google.com/drive/folders/1NzsGQIZ6N14MDTrdIZxV725i1UT8BBW-?usp=sharing

Make sure you know your motherboard model and manufacturer company name to find the compatible driver of Realtek for your motherboard model and company. Otherwise, if you install it from any other source, it might not work.
Remember, without the driver installation first, you won’t be able to install the app from Microsoft Store. You will get an error. So first install the driver and then install the app from Microsoft Store.
Step 2: Install the Realtek Audio Driver
Now that we have the necessary driver, let’s proceed with the installation process:
- 2.1 Locate the downloaded driver file: Open your File Explorer and navigate to the folder where you downloaded the Realtek Audio driver package.
- 2.2 Run the driver installer: Double-click on the driver file to launch the installation wizard. Follow the on-screen instructions to complete the installation process. If prompted, grant administrative privileges to the installer.
- 2.3 Reboot your system: After the installation is complete, it\’s recommended to reboot your computer to ensure the driver is properly integrated into your system.
Step 3: Access the Microsoft Store
To install the Realtek Audio Console, we\’ll need to access the Microsoft Store. Here\’s how you can do it:
- 3.1 Open the Microsoft Store: On your Windows 11 system, click on the Start button in the taskbar, and in the Start Menu, locate and click on the Microsoft Store icon. This will launch the Microsoft Store application.
- 3.2 Sign in to your Microsoft Account (if required): If prompted, sign in to your Microsoft Account to gain access to the store. If you don’t have an account, you can create one easily by following the on-screen instructions.
Step 4: Install Realtek Audio Console from Microsoft Store

Now that you’re in the Microsoft Store, it\’s time to install the Realtek Audio Console:
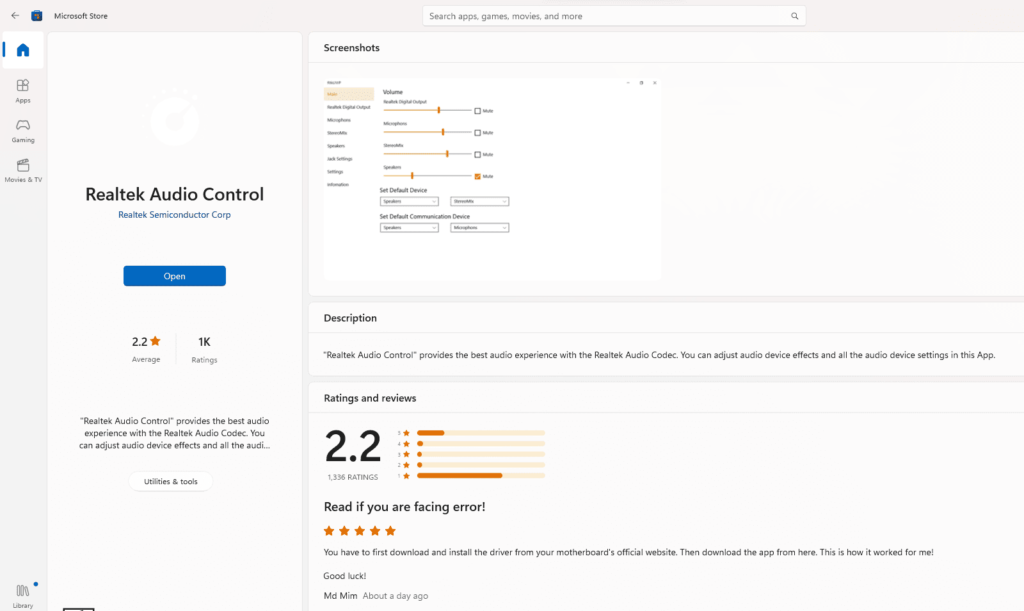
- 4.1 Search for Realtek Audio Console: In the search bar located in the upper-right corner of the Microsoft Store, type ”Realtek Audio Console” and press Enter. Or go to this link: https://www.microsoft.com/store/productId/9P2B8MCSVPLN to install the app. You will be able to install the app now.
- 4.2 Locate and select the correct app: From the search results, locate the Realtek Audio Console app developed by Realtek Semiconductor Corp. Click on the app to open its page.
- 4.3 Install the app: On the Realtek Audio Console page, click on the ”Get” or ”Install” button to begin the installation process. The Microsoft Store will download and install the app on your system automatically.
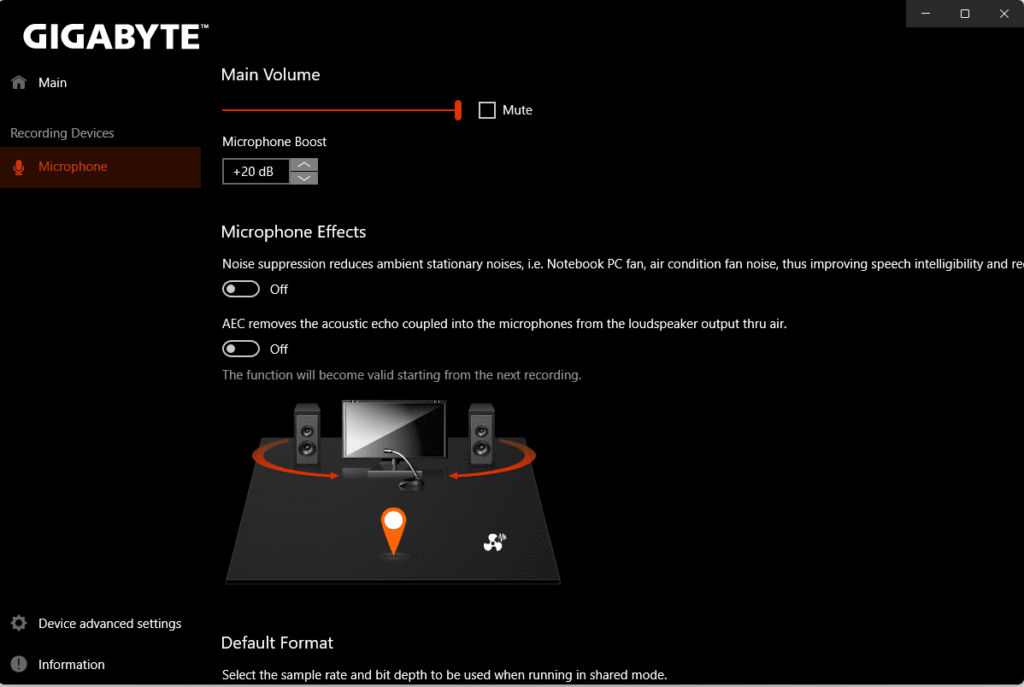
- 4.4 Launch Realtek Audio Console: Once the installation is complete, you can find the Realtek Audio Console in your Start Menu or by searching for it in the taskbar. Launch the app to start customizing your audio settings.

Video: How to Install Realtek Audio Console Driver & Install Realtek Audio Control App From Microsoft Store
Conclusion: Realtek Audio Console Installation
Congratulations! You have successfully installed the Realtek Audio Console on your Windows 11 system. With this powerful tool, you can now fine-tune your audio settings, enhance your listening experience, and immerse yourself in a world of high-quality sound.
Remember to periodically check for driver updates on your motherboard manufacturer’s website to ensure you have the latest features and compatibility improvements. Enjoy the sonic journey that awaits you on Windows!
If you still fail to install then kindly comment below your issue, and we will try to help you. If you found this article helpful then also share your feedback in the comment below.
Learn how to change the system drive for app installation on Windows 11.
Also, share this with your friends and social media so that more people can be benefitted. Follow us on Google News to stay updated with the latest technology updates.


Very informative thanks for sharing.
Thanks very much. It worked